
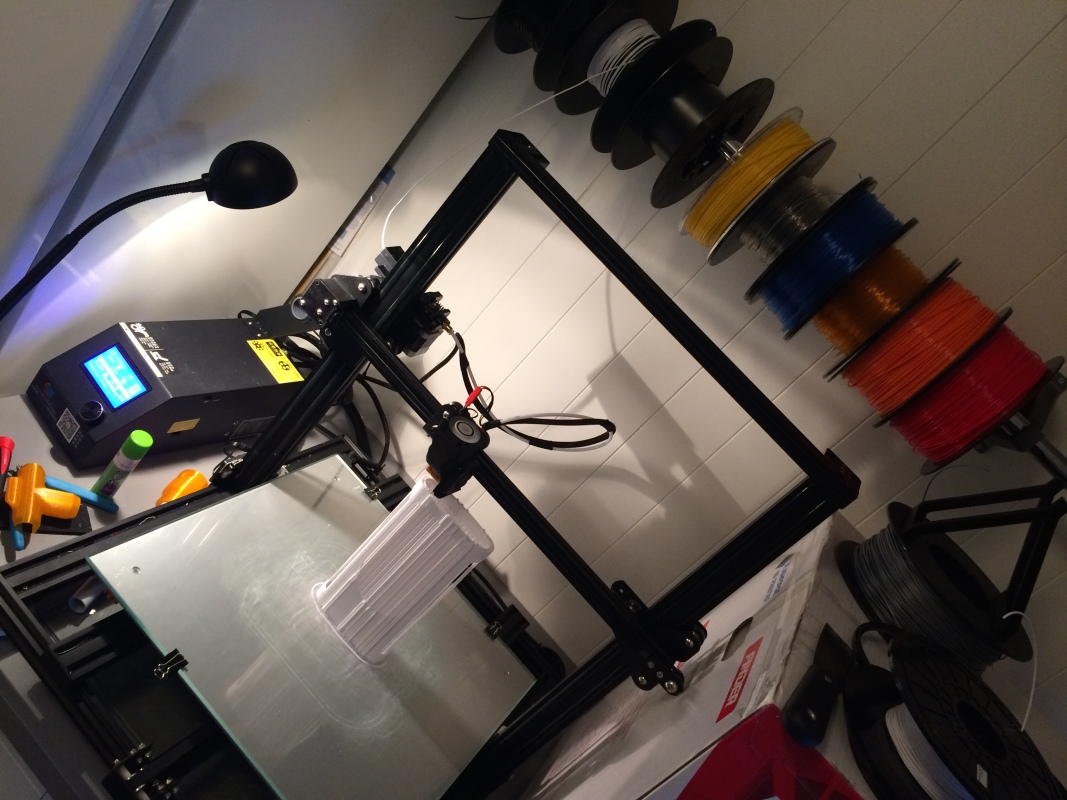
I recently bought a Creality CR-10-S4 3D printer and one of my first priorities was to make the machine silent so I could work in the same room as the printer. This work included installation of vibration dampers on the stepper motors, changing stock fans and redesigning certain components on the CR-10. There are several things you can do to make a 3D printer more silent, and it varies from printer to printer. For the CR-10, it will vary from machine to machine as well. After reading forum posts, blogs and facebook groups itˋs clear that the machines are sent out from the factory with different components and noise sources. My biggest priority was to change the hotend fan, it had the noise of a horrible vacuum cleaner, but others reported the power supply fan as the worst noise source. So, identify YOUR noise sources.
Noise sources I have identified and improved
- Noise from stepper motor vibrations transmitted to the printer frame
- X and Y axis steppermotors.
- Extruder stepper motor.
- Noise from fan (fan motor, bearings and general fan design)
- Hotend fan (40x10mm).
- Control box motherboard fan (50mm).
- Control box exhaust fan (40x20mm).
- PSU fan (60mm).
- Noise from the air being moved, passing obstacles, turbulence
- The hotend fan cover could need a better design to guide the air.
- The control box exhaust fan is mounted onto threaded inserts in the control box chassis that stick out approx 5mm, which leaves an airgap between the fan an the chassis. Next, the chassis is cutout to look like a fan grill, but the openings are very very small and poorly designed for the amount of air passing by. Also, the circular hole is actually smaller than the fan.
- The PSU fan wins the first price for stupid design and assembly. It’s protected behind the PSU chassis cover with a fan grill design. On top of this cover is another cover, the control box cover, also with a fan grill design, though with unmatching design. Fully assembled the fan has less than 20% air opening combined in the covers! Dragging air through this makes noise.
Noise sources identified, but not improved
- The control box motherboard fan is sucking air from between the display cables and blowing air directly onto a bunch of other cables.
- Noise from stepper motor vibrations caused by stepper driver type
- Noise from filament cooling fan (the radial fan next to the hotend)
- I’ll leave this one for now. It doesn’t seem to make much noise.
- Noise from both Z axis stepper motors transmitted to the printer frame
- The brackets for these steppers makes it a bit difficult to upgrade, and there are less movement in these stepper compared to X and Y axis steppers. However, all steppers are on while printing, even when they are now moving, so some vibrations can be detected.
I ordered stepper dampers and fans on Ebay.
Stepper dampers
My first and simplest step towards silence was mounting stepper dampers on the x and y axis. The stepper motors are mounted in such a way that the vibrations will be transmitted and amplified through to the aluminum frame. The dampers can be mounted in 15 minutes and it really made a big difference! Probably the simplest and most significant noise reduction you can do on a CR-10.


Installing a stepper damper on the extruder isn’t strictly necessary, and some may argue the motor doesn’t move enough to create much vibration noise, but I had extra dampers and gave it a go.
The Z axis stepper motors are not moving much compared to X and Y and are generally not considered a damper target. Furthermore the stock CR-10 Z axis stepper mount isn’t damper friendly as the stepper motors are held in place by two M3 screws on the same side. A new mount could be designed to fixed this, but for now I’ll leave it as is.
The CR-10 used to be like having a heavy duty industrial machine in the house and you could easily hear it in nearby rooms. With the dampers mounted it became more like what a 3D printer should be.
What fans to buy
I decided to change the hotend fan, the two control box fans and the fan in the power supply. I wanted silent fans with good CFM (cubic feet per minute) at a reasonable price. I read through quietpc.com overview of fans and found that Gelid Silent was the reasonable choice, for 40, 50 and 60mm sizes. I ordered the fans from Ebay. I also ordered an additional 40x40x20 nobrand “silent” fan for the control box exhaust just in case the gelid one would be too weak. After a couple of weeks I received the fans.

- Case fan comparisons: https://www.quietpc.com/casefans
- Further information about Gelid Silent fans: http://gelidsolutions.com/product-category/thermal-solutions/case-fan/silent-case-fan/
Other brands of silent fans can also be used. Noctua or Noiseblocker are maybe the most known silent fans in the market, but a bit more pricey. Before you choose a new fan, examine why the fans are where they are, what components they are supposed to cool and how they do it. In this blog post you will see how I swap out fans for lower CFM (cubic feet per minute) fans, but only after surrounding conditions are changed.
It works for me, use your own reason.
The hot end fan
I started the fan swap modification with the hot end fan. There are reports of several people having trouble with stuck nozzle because of the Gelid Silent 40 CFM performance is too weak and it doesn’t cool the hotend enough. I have not experienced stuck nozzle after changing to Gelid Silent 40, but the fan is dead silent compared to the stock fan. However, the Gelid Silent 40 does indeed have significant lower CFM than the stock fan, so if you are worried about it keep searching for fans.

The fan housing was my next target. I absolutely hate the fan grills that interrupt air flow and the whole fan house design looked only like a bracket for the fans. It does not look like the Creality design engineer had air flow and cooling in mind. Off course, in my opinion the whole X gantry trolley the hotend is mounted on should be designed differently if optimal airflow was to be achieved. Oh well.
I took measurements and designed a new one in Fusion 360 and printed it.

I wanted to keep the stock nozzle fan on the side, so I focused my design efforts on a retrofit fan bracket that would direct air unobstructed to the hot end and away. The Gelid Silent 40 is mounted on the outside of the housing, for simple maintenance.
The solution wasn’t optimal so I designed a new one. This new fan housing design can be downloaded from Thingiverse.com, see links at the bottom of this blog post.


Fang design? As per now I don’t see the point as my designs are coming out okay. Over time I may consider a fang design for better airflow from both sides, but this depends on what I’ll print in the future.
The control box fan
This fan is 50mm and is mounted onto a metal bracket. As usual on the CR-10 the airflow is obstructed, and this time the fan is placed right in front of a bunch of cables. Although it’s possible to design a bracket that can hold the fan in a better position this isn’t a priority. I’m swapping out the stock fan with a Gelid Silent 50.


The control box exhaust fan
The stock fan is a 40x40mm and 20mm thick fan. It isn’t actually very noisy. But everything around it is the problem. First, the fan grill in the enclosure is obstructing air flow as if it was a functional requirement. Second, the threaded inserts in the control box chassis is sticking out 5 mm on the inside and creating a big air gap between the fan and the inner wall. And the diameter of the exhaust hole itself is actually smaller than the fan.
I wanted to swap the 40x40x20 fan with a Gelid Silent 4. As with the hotend fan, air flow can be a challenge here. But instead of having strong fans pulling air through small restricted openings I can use this smaller fan if I open up the air flow into the enclosure.
I modified the chassis by removing the grill design. I drilled small holes in the grill and used small pliers to pry it off. Using the stock fan with this hole in the chassis already lowered the air flow noise. But the air gap still annoyed me and it was obvious noise could still be lowered.
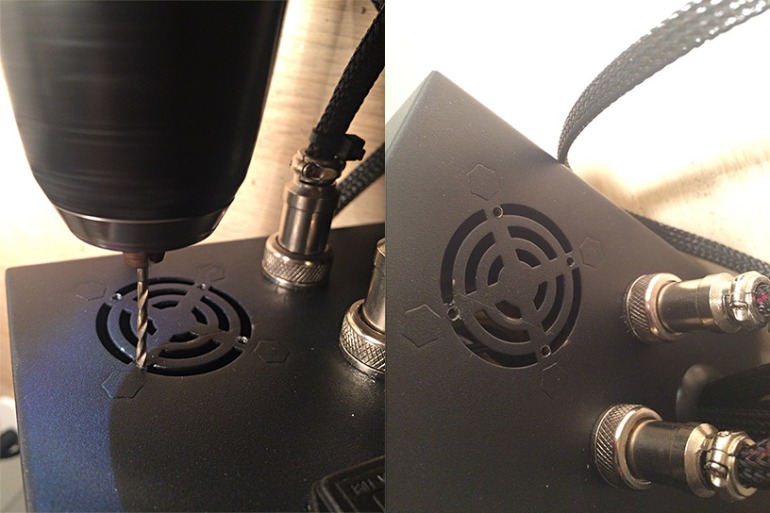

I designed a “fan funnel” that I could mount between the fan and the threaded inserts on the inside. This funnel then acts like an extension of the fan, guiding the airflow out. The air gap is then eliminated. The 3D model can be downloaded from thingiverse.com using the links below in this blog post.


The PSU fan
As mentioned earlier in this blog post, the PSU fan wins the first price for stupid design and assembly. This becomes obvious when you turn the control box over and look at the bottom cover. A cover over a cover etc. With obstacles like that a strong (and noisy) fan may be needed yes – or just remove the obstacles.

After some thinking about how I should make life easier for the fan I decided that I could design a complete new bottom plate for both the PSU and the control box combined.

I added holes for additional airflow in the front (the four hexagonal holes) so that the suction of air into the control box became easier. I hope this will help both fans in the control box (motherboard fan and enclosure exhaust fan).

The large copper wire wrapped donut visible inside is a toroid core inductor that will get hot when the PSU is on. Especially when the heated bed is set to a high temperature over a longer period of time. Inside of this component is a temperature switch, also visible with to black wires attached, which will control the 60mm PSU fan. When the component reach a set temperature the fan will turn on to enable cool air to flow by.
I designed this cover with additional holes for airflow around the toroid core inductor, but overall kept the rest of the design as-is in case of existing airflow engineering (but I doubt there are much to it). The PSU have additional holes in its main enclosure, but some of these are obstructed when mounted into the CR-10 control box.

With this solution the fan can run with minimal efforts and new fresh air can cool the hot components. The 3D model can be downloaded from thingiverse.com using the links below.
Parts on Thingiverse
I have made the parts available on thingiverse.com
- hotend fan cover
- control box fan funnel
- PSU cover
Please visit https://www.thingiverse.com/thing:2783408 to download the STL parts.
If you have gotten this far down the blog post something must have poked your interest. I’d love to hear what you think about it, check out the comment section or the contact link 🙂

Thanks for the post, that’s super detailed explanaton, after almost 2 months, whats your feeling about your mod? Works? or you plan made more upgrades?
thanks
LikeLike
I have just revised the design for the control box bottom plate, printed a new one and I’m now printing with the printer. The blog post is updated with images of the latest design revision, and Thingiverse also have the latest design. My first design only covered the PSU, but as you can see in the images the plate now covers the whole area. This means you can use 5pcs M3 bolts as usual to fasten the plate, and it was important to reduce noise from vibrations. The rest of the designs works as they are supposed to. I’m glad you like it!
LikeLike
Thanks for the reply, next week I star to make some silence on my cr-10, thanks a lot!
LikeLike
Just waiting for my fans to start grinding and then will be replaced, Thanks for the detailed write up, it’s booked marked for what I know I will need.
LikeLike
Thank you so much for the post, the measurements for the fans are all spot on and made my life much easier. Love the tunnel and the plate they look really cool.
Printing the bottom plate was a bit of a challenge as my print plates were about 1 cm shorter but diagonals ftw 😀
Noise reduction after all of this is impressive, from 60 db to around less than 40 db overall, it’s now so quiet that I’m not sure it’s printing half the time.
Overall by changing only 2 fans, the one on the hot end 40x40x10 and the main one in the box 40x40x20 and the dampers you’ll get about 90% of the result.
LikeLike
Thanks for the design and detailed instructions.
The fan bracket fits perfectly and directs the air to where it should go, however it adds a little of air noise, maybe a similar level to the original.
The search continues….
LikeLike
Here is a video instruction for steppers dampers on CR-10 3D printer – https://youtu.be/2j9YAcWDoto
LikeLike
I have heard that the 40mm x 20mm fan in the back of the control box is the loudest fan. Your blog seems to contradict that unless I am mistaken. I am getting a lot of high pitch whine from my control box in particular. I bought two noctua 40 x 40 x 20mm fans with the intent to re-do my hot end cooling and part cooling fans with them on a fang mount, but if I can significantly drop the volume on that Control Box, I will keep the less noisy stock fan for the part cooler and put that noctua on my control box.
I’m loving my S4 so far. Just getting started modifying it to print more materials and also to work quieter. Added the dampers to the X/Y axis, which was a huge improvement in noise. If I could find a way to dampen belt noise after I get these fans under control, I will be in heaven. I think that long stretch of unsupported Y axis belt vibrates a lot going back and forth. Maybe a small wheel underneath the center supporting it slightly would eliminate the most harsh noises it makes. The Y axis belt is actually the loudest part of my printer now.
I notice that even with the dampers, I still get some salmon skin effect. Going to try the “smoother filters” out on the X/Y to see if they help at all. From what I hear the stepper drivers on the Creality boards are supposed to respond well to this flyback diode setup, so I am hoping they help a bit more. I don’t notice that salmon skin effect as much on perfectly X or Y surfaces, but on curves it’s really noticeable right now. The smoothers could help to quiet the rig down a touch more as well…
LikeLike
Thanks for your interest in the blog post. From what I have seen in various forums and FB groups the noise sources varies a lot. For some it’s the control box fan, others it’s the hot end fan etc. The quality of the stock fans are so so I guess. I have never thought about belt noise. Maybe something I should look into. I’d assume they would make a low hum kinda noise. Good luck with your modifications and happy printing!
LikeLike
wow amazing good tips, gonna do that cut in my cabinet to, because that grill prevents a lot of air to come in, and love that extruder part 😀
tnx for sharing dude 😀 love it
LikeLiked by 1 person
Can you tell me, that the 60x60x25 PSU fan is fit into it, what it to say can I buy a 25mm tall PSU fan?
LikeLike
Really great post, thanks for all the information!
LikeLike
Your welcome! I’m glad you liked it
LikeLike
“The control box exhaust fan is mounted onto threaded inserts in the control box chassis that stick out approx 5mm, which leaves an airgap between the fan an the chassis. Next, the chassis is cutout to look like a fan grill, but the openings are very very small and poorly designed for the amount of air passing by. Also, the circular hole is actually smaller than the fan.”
I think It is a thoughtful design. The MOSFET PCB of my CR-10S on the back was broken. After I repaired it, I did not put the board back in its place to try operate the heating. I switched the bed heat and waited some minutes. After that the heat sink of MOSFET was very very hot. When I put my hand to the back side of the control box I felt that the air flowed. So I think that this is the reason for 5mm gap and that the hole is smaller than the fan, because it is forced to cool the MOSFET.
After you close the gap between fan and back of box, the MOSFET does not get enough cooling.
LikeLike
Just wondering allmost a full year after how your findings are with these changes.
I ordered the fans and dampers today so I am anctious to learn if you are still happy with your modifications.
LikeLike
Excellent question! I’m still very happy with the modifications I did. I’ve used the printer as described in the blog post until now and the sound level is acceptable, as I’m usually working at my desk 1-2 meters away from the printer. As a matter of fact I have been wondering about adding dampers to the two Z motors as well, although I know most people advise against it due to little effect they say. But to me, I actually hear the Z’s a lot too now!
Today will be another big change in my printers life, I received a Titan Aero extruder and hotend from E3D-Online that I will install. Good luck with your noise hunt!
LikeLike
Hope you can share the installation and the whole experience of the new parts on you blog !
For me now I will start with the dampers (X/ Y ) / Fans and TL smoothers for the X / Y / Z motors. I am still thinking about upgrading the firmware but not sure as there is no way back to the stock firmware (well there is one .. buying a new motherboard for the printer).
But I will keep a close eye on your blog in regard to any other CR-10 upgrades.
Thanks so far for sharing ! It helped me a lot and saves me a bunch of time so well appreciated !
LikeLike
could you include a link to the custom fan shroud you made? also what size fans do i need and how many? im trying to do this to my cr-10 with noctua fans, thank you very much
LikeLike
Zackery, all the STL files can be found on Thingiverse and there is a link to the files in the blog post. Please see the section ‘what fans to buy’… about what fans to buy 😉
I believe Noctua fans should work okay as long as you check dimensions etc.
LikeLike